recent posts

Wednesday 4 May 2016

2016/17 Kaisercraft Design Team Application


I'M ONE OF THE 25 FINALISTS OF KAISERCRAFT DT APPLICATION 2016/17!!!

The feeling of opening up to your mailbox to see the congratulation email was really mind-blowing. Then the wait began for the box of mysterious supplies such that we can proceed with the second round of application. 

So here I am! 
I'm bringing you a photo tutorial this time round (it's been awhile I know). :)

Check out the supplies! There are all part of Kaisercraft's latest line of products from Boho Dreams Collection. They're being super generous with the supplies! 


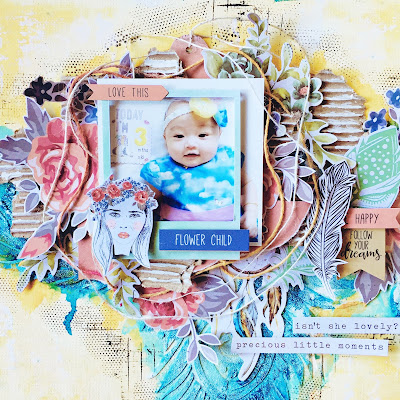
This is the final look of the canvas!


This is a rather unorthodox layout for a baby girl as I would think, 
yet at the same time, I thought it was perfect. 

I made this canvas because I really like her blue little dress picturing the clear blue sky, hence blue was chosen as the primary colour. The yellow/orange I used in the background are from her headband and the pink in the flowers are from her sash. If you're a beginner, I would suggest that you try working with the colours that are already in your pictures, you will never go wrong that way. 

Bohemian styles always reminds me of feathers and dreamcatchers. I hoped the best for my dear friend's baby, hoping she'll be light and free of worries like feathers and happy as dreamcatchers retained good dreams and memories. Stay cute! :)

________________________________________________________

Let's begin with the tutorial!

I started prepping a 12x12 inches canvas with white gesso first and started painting.

I used Kaisercraft's Kaisercolour (acrylic paint) in Mango and Antique White with a sponge brush.


As you can see, I did not apply a even layer of colours. 
I wanted some contrast, hence some spots are darker. 

You can really use any type of wide brushes to create this effect, I happened to use sponge brush because it was nearest to me (Mixed Media should be free and easy! There're no right and wrong!).


Now, I'm apply modeling paste over Kaisercraft's stencil 'Feathers'. 

I had a general idea in mind of the ultimate shape I want my center piece to be. Hence, I'm aligning the feathers in such a way that I created an inverted triangle. 


To add a little interest, I pouring embossing powders in both holographic and white while the modeling paste was still damp.

Take note: Pour the embossing powders one-by-one, meaning that you should pour one of them first and shake off the excess before moving on to another. 

The sequence matter as well. Pour the one that you want to retain the most. Since most of the damp modeling paste will retain the first embossing powder than the second. For this instance, I pour holographic embossing powder first as I want the feathers to be sparkly! :)

Another important step! Always wait for your modeling paste to be dried completely before heat-setting the embossing powders, otherwise the modelling paste will start to bubble.


Once, I settled the heat-setting, I sprinkled on Kaisercraft's Iridescent Mists in Denim by tapping it with a brush. 

I find it easier to control colours (especially dark colours!) this way as I can limit the area that the colour will go to. 

As you can see in the picture, I'm spraying on water to dilute the dark sprinkles such that the colours can flow around the stencilled area.


The white embossing powder that I heat-setted previously also act as a resist, hence you can see there some white spots. I also painted a layer of Kaisercraft's Kaisercolour (acrylic paint) in Spearmint around the outer circumference of the feathers. 

The different shades of blue created by the magic of water and the white spots leave some interesting contrast to the canvas! :)


I wished there's a way so let you see how bright it sparkles!


With the background done, I proceed to embellishing my centrepiece. 

I fussy cut out the flowers from 'Wild' in Boho Dreams Collection. I highly recommend you get this patterned paper as the amount of flowers you can get from this piece of paper is WOAH! In fact, I'm gonna stock up on this paper once this collection is in my local scrapbook store.

I also randomly tore off pieces of Kaisercraft's Corrugated Cardboard and 'Wanderer' from the Boho Dreams Collection. The frame and the flower girl were also fussy cut out from 'Bohemian' of the same collection.


The leaves I used here are actually strip sticker from Oh So Lovely Collection's sticker sheet. Instead of cutting the strip sticker vertically and creating a harsh edge, I trimmed it according to the shape of the leaves. 


I'm also upping my layering game with the help of Kaisercraft's Boho Dreams Collectables. If you're a quick scrapper and don't like to spend your time fussy cutting, I highly suggest you to go for the collectables. They're awesome when you're in a rush yet in a mood to scrap. 


I'm using different baker twine in different colours and thickness to create additional interest. To bring focus to the picture, I'm circling the twines around the picture.


An important element of Mixed Media would be textures. I'm using Kaisercraft's texture stamps in Tiny Dot and Journal to create some added interest to the background yet enhancing the centrepiece as well as it sort of create a shadow around the centerpiece. 


I'm also using my palette know to swipe on some gesso to create another form of texture. The fabric of the canvas will create interesting pattern when I swiped on the gesso. This is a technique that I loved to use when working on canvas.


I also brushed on gesso on the corrugated cardboard to give it some highlights.


So here's the final look of the canvas!

I use Kaisercraft's Kaisercolour (acrylic paint) in Tropical Water as a finishing touch to the edges of the canvas and the sentiments I used are from the Oh So Lovely Sticker Sheet.


Some close-up shots!


________________________________________________________

Supplies Used

Kaisercraft
Acrylic Paint - Mango
Acrylic Paint - Antique White
Acrylic Paint - Spearmint
Acrylic Paint - Tropical Water
Iridescent Mist - Denim
Stencil - Feathers
Clear Stamp - Tiny Dot
Clear Stamp - Journal
Boho Dreams Collectables
Boho Dreams Patterned Paper - Bohemian
Boho Dreams Patterned Paper - Wanderer
Boho Dreams Patterned Paper - Wild
Boho Dreams Sticker Sheet
Oh So Lovely Sticker Sheet
12x12 inches Corrugated Cardboard

Others
12x12 inches Canvas
Liquitex White Gesso
Liquitex Modeling Paste
Ranger Holographic Embossing Powder
Stampendous White Embossing Powder
StazOn Black Inkpad
Twines

________________________________________________________

That's all for today's post!
Wish me luck! :)
#fingerscrossed


.